Porcelain Slab Technical Guide By CIERO
Part 1: Material Science and Composition
Introduction: Engineering the Perfect Surface
In the realm of high-performance architectural surfaces, ambiguity is the enemy of precision. For decades, architects, designers, and specifiers have navigated a confusing landscape of marketing terminology, where the words "ceramic," "porcelain," and "sintered stone" are frequently—and incorrectly—used interchangeably. Specifying the wrong material for a high-traffic commercial floor or an exterior ventilated facade can lead to catastrophic structural and aesthetic failures.
At CIERO, we believe that mastering the application of a material begins with mastering its molecular DNA. A true sintered stone porcelain slab is not a mere ceramic tile scaled up to massive proportions; it is a highly engineered glass-ceramic matrix. It represents the pinnacle of biomimicry, accelerating the natural geological processes that take the Earth millions of years to complete into a matter of hours within a high-tech industrial environment.
This section dismantles the marketing jargon, providing a transparent, highly technical breakdown of the raw materials, the thermodynamic manufacturing process, and the critical structural differences between traditional porcelain and modern sintered stone.
The Mineral Recipe: Nature, Refined
Unlike resin-bound quartz or solid surface acrylics—which rely on petrochemical binders that are susceptible to UV degradation and thermal scorching— Sintered stone slabs are 100% natural and inorganic. The structural integrity of the slab relies on a highly calibrated recipe of four primary mineral groups, each selected for a specific reactive property:
Kaolin Clays (The Base Matrix): Ultra-pure, highly refined kaolin clays provide the necessary plasticity and cohesion during the "green" (unfired) state. This allows the massive slabs to hold their shape after pressing but before entering the kiln.
Refined Feldspars (The Fluxing Agent): Feldspar is the chemical catalyst of the operation. Under extreme heat, feldspar acts as a flux—melting down to form a liquid glass that flows into the microscopic voids between the other minerals, completely sealing the porosity of the slab.
Quartz and Silica (The Structural Skeleton): Quartz minerals provide the foundational hardness and flexural strength. As the feldspar melts around it, the quartz remains stable, forming an unyielding internal skeleton that gives the final slab its extraordinary resistance to abrasion and impact.
Natural Metal Oxides (The Chromatic Identity): To achieve the complex, hyper-realistic colors and veining patterns, pure metal oxides and inorganic pigments are introduced. Because these are natural minerals rather than synthetic dyes, the resulting colors are absolutely immune to ultraviolet (UV) radiation, meaning a slab installed on a sun-drenched exterior facade will never fade, yellow, or bleach over time.
The Manufacturing Process: Extreme Thermodynamics
Transforming this loose mineral powder into an impenetrable, monolithic slab requires a state-of-the-art manufacturing process known as sintering. Sintering is the thermodynamic process of compacting and forming a solid mass of material by heat and pressure without melting it to the point of liquefaction.
1. The Compaction Phase (Hyper-Pressing)
The raw minerals are atomized into a fine, uniform powder with a perfectly calibrated moisture content. This powder is then distributed evenly onto a continuous conveyor belt system.
The material enters an advanced continuous pressing system. Unlike traditional tile molds, which stamp the material, the continuous press utilizes massive steel belts to apply uniform, immense pressure—frequently exceeding ~400 kg/cm² (kilograms per square centimeter). This extreme compaction forces the mineral particles together, expelling all trapped air and creating a highly dense, flat "green" slab.
2. The Thermal Vitrification Phase
The compacted slab is then fed into industrial roller kilns that can stretch over a hundred meters in length. The slab undergoes a highly controlled, gradual heating and cooling cycle, reaching peak temperatures exceeding ~1200°C (2190°F).
At this thermal threshold, vitrification occurs. The feldspar melts into a liquid glass, fusing the clay and quartz particles together at the molecular level. Because the pressure during the compaction phase was so intense, the melting feldspar has very little empty space to fill. The result is a glass-ceramic matrix with an apparent porosity of less than ~0.05%—rendering it completely impervious to moisture, frost, and chemical intrusion.
Sintered Stone vs. Porcelain: The Technical Divide
One of the most persistent questions in the A&D (Architecture and Design) community is: What is the actual difference between porcelain and sintered stone?
While they share a similar ancestral lineage and manufacturing methodology, the distinction lies in the precise mineral ratios, the magnitude of pressure and heat applied, and the surface treatment.
Traditional Porcelain Traditional large-format porcelain slabs are typically manufactured with a higher clay content and are almost always glazed. The manufacturer presses the body of the tile, applies a liquid glass glaze to the top surface, and digitally prints the pattern onto that glaze before firing. The resulting material is highly durable, but its strength is bipartite: a vitrified ceramic body topped by a thin, protective glass wear-layer.
Sintered Stone (The CIERO Standard) Sintered stone pushes the boundaries of the material science. It utilizes a slightly different mineral blend—often incorporating higher percentages of quartz, silica, and glass minerals, and lower percentages of traditional clay. The pressing forces and firing temperatures are pushed to the absolute maximum limits of modern engineering.
Crucially, true sintered stone is often an unglazed, through-body matrix. There is no separate liquid glass layer sitting on top of the slab. The surface you touch is the same highly compressed, vitrified mineral matrix that runs all the way through to the back of the slab. This unyielding uniformity is what gives sintered stone its superior flexural strength, higher impact resistance, and absolute immunity to deep surface scratching.
Through-Body vs. Printed Surface: The Edge Profile Imperative
For designers outlining specifications and fabricators executing the cuts, understanding how a slab's pattern is applied is the most critical factor in edge detail planning.
Surface-Printed Slabs
The vast majority of standard porcelain slabs utilize high-definition digital surface printing. The complex marble veins or concrete textures are printed directly onto the top plane of the slab.
The Structural Reality: If you look at the cross-section (the raw edge) of a surface-printed slab, you will see a solid, uniform core color that matches the base tone of the print, but the veining will abruptly stop at the surface.
The Fabrication Requirement: To achieve a monolithic, thick-stone look with a surface-printed slab, fabricators must utilize a 45-degree mitered edge. By cutting the edges at an angle and folding them down, the unprinted core is hidden, and the surface pattern wraps seamlessly around the corner.
Full-Body / Through-Vein Technology
The absolute apex of sintered stone manufacturing is Through-Vein (or Full-Body) technology. Instead of printing ink on the surface, robotic systems inject different colored mineral powders deep into the slab matrix during the initial powder distribution phase, before it is pressed and fired.
The Structural Reality: The vein is not a print; it is a physical, three-dimensional mineral deposit that runs continuously through the entire thickness of the slab.
The Design Advantage: This completely changes the fabrication landscape. Designers can specify standard flat polished edges, bullnose profiles, or reverse-bevel cuts without exposing a blank core. The edge of the slab looks identical to a slab of natural quarried marble, displaying the vein slicing organically through the profile. For high-wear environments like commercial bar tops or heavy-use kitchen islands where mitered edges might be susceptible to chipping, through-vein slabs offer the ultimate combination of structural durability and aesthetic authenticity.
Part 2: Technical Specifications and Performance Data
Introduction: The Empirical Baseline for Architectural Specification
For architects, structural engineers, and commercial specifiers, design visions must be backed by empirical data. In commercial construction, material selection dictates liability, insurance risk, and long-term building performance. Relying on vague terms like "ultra-durable" or "highly scratch-resistant" is insufficient when compiling a legally binding project specification document.
This section presents the verifiable performance metrics of sintered stone porcelain slabs. Every parameter detailed below is verified by independent laboratory testing under the International Organization for Standardization (ISO) and the American Society for Testing and Materials (ASTM). By analyzing these engineering metrics, professionals can confidently specify slabs for demanding environments, including high-traffic transit hubs, commercial kitchens, and exterior skyscraper cladding.
1. Water Absorption and Impervious Porosity
The foundational metric that governs a material's resistance to staining, chemical degradation, and environmental weathering is its apparent porosity, measured by its liquid water absorption rate.
Testing Methodologies: ISO 10545-3 / ASTM C373
To determine water absorption, samples are dried to a constant mass, weighed, and then subjected to forced saturation. Under ISO 10545-3 and ASTM C373, samples are either boiled in water for a continuous five-hour period or placed under a vacuum chamber to force water into any open surface capillaries. The samples are then re-weighed.
Performance Evaluation and Architectural Implications
While international standards classify any tile with an absorption rate of 0.5% as "porcelain," technical sintered slabs consistently achieve an absorption value of 0.05%. This represents a virtually non-porous structural face.
Freeze-Thaw Immunity (ASTM C1026): In exterior northern climates, moisture absorbed into natural stone freezes, expanding by approximately 9% in volume. This generates intense internal hydrostatic pressure, causing natural granite, marble, and concrete to spall, crack, and delaminate. Because slabs have a water absorption rate near zero, there is no internal moisture to freeze, ensuring structural integrity across extreme temperature swings from -40C to +80C.
Stain Resistance and Hygiene Compliance: The absence of surface capillaries prevents organic oils, industrial greases, dyes, and acidic compounds from penetrating beneath the surface layer. Contaminants remain localized on the surface, allowing for easy removal without the need for specialized chemical restoration. This satisfies the hygiene and sanitization standards required for healthcare spaces, surgical suites, and food processing facilities.
2. Mechanical Strength and Structural Loading Profiles
Commercial flooring and countertop systems must withstand intense static point loads and dynamic rolling loads without experiencing mechanical failure. The structural strength of a ceramic matrix is evaluated using two primary metrics: Modulus of Rupture (Flexural Strength) and Breaking Strength.
Flexural Strength vs. Thickness Economics: ISO 10545-4 / ASTM C648
Flexural strength measures the ultimate tensile strength of the slab when subjected to a bending load. Under ISO 10545-4, a three-point loading test is performed where a concentrated force is applied to the center of the slab until structural failure occurs. The flexural strength is calculated in Newtons per square millimeter or Megapascals.
Why 12mm Sintered Stone Outperforms 30mm Natural Granite
A common misconception among builders is that raw thickness is directly proportional to load-bearing capacity. In natural stone, structural integrity is compromised by internal mineral veins, tectonic micro-fractures, and irregular crystalline structures.
Because CIERO’s collection of slabs feature a dense, uniform, glass-ceramic matrix free of internal fault lines, a 12mm slab achieves a flexural strength of ~45 to 55 Nm². In comparison, a premium 30mm natural granite slab typically yields a flexural strength of only 10to 15 NM².
This high strength-to-weight ratio allows architects to reduce dead weight loads on structural framing, lower shipping costs, and install large, cantilevered islands and floating vanities without needing heavy steel reinforcement supports.
Deep Abrasion Resistance: ISO 10545-6 / ASTM C1243
For unglazed through-body technical surfaces, resistance to surface wear is measured via the Deep Abrasion Resistance test. A rotating disc applies an abrasive charge of synthetic corundum powder (Al_2O_3) to the slab surface under a fixed weight for a specific number of revolutions. The volume of material carved away is measured in cubic millimeters.
The Requirement: International standards dictate a maximum allowable material loss of 175mm³ for heavy commercial traffic.
Performance: unglazed slabs restrict material loss to < 110 mm³. This high resistance to abrasion ensures that under continuous heavy foot traffic, the slab will not develop worn, dull paths or lose its texture.
3. Tribomechanical Surface Hardness
Surface scratching from abrasive particulates, metal tools, and shifted furniture can quickly ruin a material's appearance. Evaluating a surface's mechanical hardness requires analyzing its performance on both the qualitative Mohs scale and the quantitative Vickers micro-indentation scale.
The Mineral Threat: Quartz Sand Particles
The primary cause of wear on commercial floors is tracked-in dust, which consists largely of quartz sand particles. Quartz has a fixed hardness of 7 on the Mohs scale.
The Vulnerability of Natural Stone: Natural marbles, limestones, and engineered resin quartz composites typically score between 3 and 5 on the Mohs scale. When quartz sand is ground into these surfaces by foot traffic, it scratches the material, dulling polished finishes over time.
The Advantage: slabs achieve a surface hardness rating of 7 to 8 on the Mohs scale. Because the slab is equal to or harder than the abrasive sand particles, it resists micro-scratching. Metal kitchen knives, dropped keys, and heavy commercial display fixtures can slide across the surface without scratching or damaging the vitrified face, However it is important to note that with the Sand Particle (7 Mohs Scale), it is possible to lightly scracth the polished porcelain sufaces.
4. Thermodynamic and Radiometric Stability
Commercial surfaces can be exposed to extreme thermal conditions, including direct sunlight on exterior cladding panels and high heat in commercial kitchens. Sintered stone’s inorganic mineral composition provides excellent thermodynamic stability.
Thermal Shock Resistance (ISO 10545-9)
Materials used for countertops and exterior walls must withstand rapid temperature changes. The ISO 10545-9 test protocol subjects slabs to 10 continuous cycles of rapid temperature changes, moving the material from 15C to 145C within seconds.
CIERO’s collection of slabs show zero cracking, crazing, or structural failure during this test. The material’s low Coefficient of Linear Thermal Expansion ensures minimal dimensional movement, reducing stress on installation joints and adhesive tracking layers.
Fire Performance and Non-Combustibility Certification
Slabs are manufactured at temperatures exceeding 1200C, making them completely non-combustible.
Euroclass Rating: Certified as Class A1 / A1FL (the highest possible fire protection classification).
ASTM E84 Surface Burning: Achieves a Flame Spread Index of 0 and a Smoke Developed Index of 0.
Practical Benefit: Under direct flame exposure, slabs do not ignite, burn, or emit toxic smoke. This makes them an ideal choice for commercial elevator interiors, fire escape corridors, and public exit pathways where strict building codes apply.
UV Resistance and Radiometric Color Stability (DIN 51094)
Many engineered surfaces utilize organic pigments or polyester resin binders that degrade when exposed to solar ultraviolet radiation. UV rays break down polymer chains, causing the material to yellow, fade, and structural weaken over time.
Slabs are tested under DIN 51094, which exposes samples to intense artificial UV radiation for extended periods. Because slabs uses 100% inorganic metal oxides for coloration, the material shows a color change value of 0. The color remains completely stable, allowing for seamless color matching between indoor and outdoor sections of the same project.
5. Tribological Safety and Traction Compliance
For property owners and commercial builders, managing slip resistance is essential for public safety and liability prevention. Public walkways must maintain adequate traction under both wet and dry conditions.
Dynamic Coefficient of Friction (ANSI A326.3)
In North America, slip resistance is evaluated using the ANSI A326.3 standard, which measures the Dynamic Coefficient of Friction (DCOF) under wet conditions using a automated tribometer.
Standard Level Interior Subfloors: Must achieve a minimum DCOF value of 0.42 for areas expected to be walked upon when wet. Matte-finish commercial slabs exceed this baseline, delivering values of \ge 0.50, providing safe traction for high-traffic corridors.
High-Risk Wet Commercial Zones: For environments like public pool surrounds, professional locker rooms, and commercial kitchens, offers structured finishes that deliver a DCOF of \ge 0.55 to 0.65, ensuring safety even in the presence of water or grease contaminants.
European Ramp Test Classifications (DIN 51130)
For international project specifications, the DIN 51130 R-Scale categorizes slip resistance based on the angle of an inclined ramp lubricated with engine oil:
R9 (6° to 10° Incline): Ideal for dry office environments, corporate boardrooms, and residential living spaces.
R10 (10° to 19° Incline): Suitable for public restrooms, restaurant dining spaces, and covered entryways.
R11 (19° to 27° Incline): Mandatory for exposed outdoor plazas, open transit steps, and heavy industrial work areas.
R12 (27° to 35° Incline): Engineered for food production facilities, commercial kitchens, and steep drainage ramps.
Slabs are manufactured with specific surface textures to match these requirements, allowing designers to select the appropriate R-rating for every zone within a commercial facility.
6. Comprehensive Technical Data Sheet (Master Specification Matrix)
This master matrix compiles the engineering metrics of sintered stone slabs, referencing international standards and providing a clear data sheet for architectural submittals.

Conclusion: Empirical Performance for Modern Architecture
The technical specifications of sintered stone porcelain slabs highlight the material's advanced engineering. By addressing the common failure points of natural stone and resin quartz composites—such as porosity, low flexural strength, UV degradation, and scratch vulnerability—CIERO provides architects and builders with a reliable, high-performance surface material.
Whether specified to handle the continuous wear of an airport terminal floor, withstand the freeze-thaw cycles of an exterior facade, or maintain hygiene standards in a healthcare setting, slabs deliver the performance data required for modern architectural design.
Part 3: Substrate Engineering and Installation
Introduction: The Liability of the Subfloor
In commercial and high-end residential construction, a material’s inherent strength is entirely dependent on the structural integrity of the substrate beneath it. A 12mm sintered stone slab possesses extraordinary flexural strength and surface hardness, but it is not a structural bridging material. If the floor beneath it bends, sinks, or shifts, the energy transferred into the rigid slab will eventually seek a release point—resulting in a catastrophic stress fracture.
For Builders, General Contractors, and Tile Setters, large-format slab installation is a high-liability phase. Traditional 12x12-inch tile methods are insufficient and dangerous when applied to slabs measuring 1600mm x 3200mm.
This section provides the exact substrate engineering tolerances, adhesive mechanics, and logistical protocols required to successfully install sintered stone slabs. By strictly adhering to these guidelines, contractors can mitigate liability, eliminate point-load fractures, and guarantee a permanent, monolithic installation.
1. Structural Deflection Tolerances: The L/720 Imperative
Deflection refers to the vertical displacement or "sag" of a flooring assembly when subjected to a live or dead load. In traditional ceramic tile installations, the industry standard for allowable subfloor deflection is L/360 (where L equals the length of the unsupported span).
However, standard tiles have frequent grout joints that act as micro-hinges, absorbing minor subfloor movement. A massive, rigid slab has no hinges.
The Large-Format Mandate: For sintered stone slabs, the subfloor framing must be engineered to a strict deflection limit of L/720 under combined live and dead loads.
What does L/720 mean in practice? If the floor joists span 15 feet (180 inches), the maximum allowable bending in the center of that room under full load is merely 0.25 inches.
To achieve this rigid structural baseline over wood-framed floors, builders must often reduce joist spacing (e.g., from 16 inches on-center to 12 inches on-center), increase joist depth, or add a double-layered exterior-grade plywood subfloor matrix. Without addressing the L/720 requirement, the floor will flex under dynamic loads, shearing the adhesive bond and cracking the slab.
2. Substrate Flatness: The 1/8-Inch Rule
Because large-format slabs cover massive square footage without interruption, they cannot contour to an uneven subfloor. Even minor dips in the concrete or wood substrate will create hollow voids beneath the slab.
The Tolerance Standard: According to the Tile Council of North America (TCNA) and ANSI specifications, the substrate must not have a variation exceeding 1/8 of an inch over a 10-foot span and no more than 1/16 of an inch over a 24-inch span.
Executing the Flatness Standard:
Topographical Mapping: Before installation, the setter must map the floor using a precision 10-foot aluminum straightedge or a continuous rotary laser level.
Grinding High Spots: Any concrete humps or ridges must be mechanically removed using a planetary diamond grinder.
Pouring Self-Leveling Underlayment (SLU): Low spots must be filled with a high-compressive-strength cementitious self-leveling underlayment. The SLU must be poured and smoothed with a gauge rake to create a perfectly planar surface. Note: Never use the thinset adhesive to "build up" or compensate for a low spot; mortar shrinks as it cures, which will pull the slab out of alignment.
3. Adhesive Mechanics and 100% Coverage Technology
The leading cause of large-format slab failure is a lack of mortar coverage. If a heavy rolling load (such as a scissor lift, luggage cart, or kitchen island) passes over a void where there is no adhesive supporting the slab, the point-load will punch through the ceramic matrix.
To prevent this, installers must achieve 100% void-free mortar coverage utilizing highly modified, large-and-heavy-tile (LHT) mortars (ANSI A118.15 compliant) and the "Double-Buttering" technique.
The Troweling Protocol
The Euro-Notch Trowel: Installers must use a specialized slanted-ridge or "Euro-notch" trowel. Unlike traditional square notches, the slanted notch is designed to collapse completely over itself, eliminating trapped air corridors.
Parallel Troweling: Mortar must be combed in straight, parallel lines on both the substrate and the back of the slab. Swirling or semi-circular trowel patterns trap air pockets and are strictly prohibited.
Directional Alignment: When the slab is placed, the mortar ridges on the slab must run parallel to the mortar ridges on the floor.
Evacuating the Air (Vibrating Beaters)
Once the slab is lowered into the thinset, human body weight is not enough to collapse the ridges. The setter must use a specialized variable-frequency vibrating plate or a heavy rubber manual beating block. The installer starts at the center of the slab and works the vibrator outward toward the edges, moving perpendicularly across the trowel lines to drive the trapped air out of the perimeter and compress the mortar into a solid, monolithic bed.
4. Movement and Expansion Joints (TCNA EJ171)
Commercial buildings are dynamic environments. Concrete slabs shrink, steel framing expands with heat, and multi-story structures experience wind-load sway. If a massive, rigid floor is installed tight to the perimeter walls without room to breathe, the building's structural movement will compress the floor, causing the slabs to "tent" or buckle.
To manage this kinetic energy, installers must follow TCNA EJ171 guidelines for movement joints.
Expansion Joint Spacing Requirements
Standard Interior Environments: Dynamic movement joints must be placed every 20 to 25 feet in both directions.
Exterior Applications & Sun-Flooded Atriums: Due to massive thermal expansion from direct UV heat, exterior installations require movement joints every 8 to 12 feet.
Perimeter Isolation: A mandatory 1/4-inch to 3/8-inch gap must be left around all perimeter walls, columns, pipes, and fixed structural elements.
The Chemistry of the Joint
An expansion joint cannot be filled with rigid cementitious or epoxy grout. It must be filled with an elastomeric compound capable of stretching and compressing.
Polyurethane or Silicone Sealants: Installers must use a 100% silicone or premium polyurethane architectural sealant (matched to the slab color).
Backer Rod Integration: To prevent the sealant from bonding to the subfloor (which would restrict its ability to stretch), a closed-cell polyethylene backer rod must be pressed into the joint first, followed by the sealant layer. This ensures the joint operates as an active shock absorber for the flooring system.
5. Handling, Logistics, and Site Transport
Before a single cut is made or a drop of mortar is mixed, the slab must be moved from the delivery truck to the installation zone. A 12mm 1600×3200mm slab can weigh over 300 lbs Due to its massive surface area and slim profile, improper handling will induce immediate flexural fracture.
The Golden Rule of Slab Logistics: A sintered stone slab must NEVER be carried or transported flat. It must always be moved on its edge, under tension.
Essential Handling Equipment
Contractors cannot rely on brute force to move these materials; specialized mechanical support systems are mandatory.
A-Frame Carts: When transporting slabs across a job site, they must be strapped securely to heavy-duty, rubber-lined A-frame carts. The A-frame keeps the slab angled slightly off-vertical, preventing lateral bending while distributing the weight evenly across its length.
Vacuum-Suction Handling Frames: To lift a slab from an A-frame and lay it horizontally onto a cutting table or the subfloor, installers must use an adjustable, modular aluminum handling frame equipped with manual or battery-operated vacuum cups.
The frame features rigid longitudinal and transverse cross-bars that lock the slab into a completely stiff, planar position.
The vacuum cups grip the face of the slab, allowing multiple workers to lift, tilt, and lower the piece simultaneously without placing any torque or bending stress on the ceramic matrix.
Site Preparation
Prior to bringing the slab inside, the General Contractor must ensure the logistics path is clear. Doorways must be measured for diagonal clearance, and temporary floor protection must be laid down to ensure the smooth rolling of A-frame carts. Attempting to pivot a 3200mm slab around a tight stairwell corner without pre-planning is a common cause of costly material damage.
Part 4: Master Fabrication Protocols
Introduction: Respecting the Shop Floor
In the stone industry, a material's reputation is made or broken on the fabrication table. While architects admire aesthetics and builders evaluate structural parameters, the fabricator deals with the daily physical reality of cutting, routing, and shaping slabs.
Many traditional stone shops make the mistake of treating sintered stone exactly like natural granite or engineered quartz. This approach often leads to broken blades, chipped edges, and cracked slabs. Sintered stone is a highly compressed, completely vitrified glass-ceramic matrix. It behaves differently under a diamond blade than a resin-bound quartz composite or a coarse-grained igneous rock.
To earn the trust of CNC operators, bridge saw operators, and master fabricators, CIERO provides this transparent, highly technical fabrication manual. Mastering these parameters prevents material waste, maximizes tool lifespan, and ensures clean, crisp edge profiles.
1. Managing Internal Tension: The Perimeter Relief Cut
During the manufacturing process, slabs undergo intense mechanical compression and rapid thermal cooling. While advanced industrial cooling zones minimize internal stress, every unworked large-format slab retains a degree of residual internal tension locked within its perimeter.
If a fabricator drops a high-speed diamond blade directly into the center of a raw slab to cut out a countertop template without relieving this tension first, the release of kinetic energy can cause the slab to pop, split, or fracture mid-cut
The Relief Protocol
Mandatory Trimming: Before processing any kitchen island, vanity, or wall cladding template, the fabricator must trim 2cm to 3cm (3/4" to 1-1/4") off all four sides of the slab.
Execution Order: Cut the two long sides first, followed by the two short sides. These continuous perimeter cuts break the outer tension ring of the vitrified matrix, stabilizing the slab and allowing for precise, safe internal cutting.
2. Tooling Specifications: Soft Bonds and Continuous Rims
Sintered stone has a Mohs hardness of 7 to 8, making it highly abrasive to cutting tools. To achieve clean cuts without chipping the decorative face, fabricators must use specialized blades and tooling.
Bridge Saw Blades: The Soft-Bond Matrix
Traditional granite blades utilize a hard metal bond matrix to hold the industrial diamond grit. When used on sintered stone, the hard metal bond does not wear away fast enough. The diamonds become dull, the blade "glazes over," heat builds up, and the blade deflects—causing crooked cuts and severe edge chipping.
The Requirement: Fabricators must use a diamond blade specifically engineered for porcelain/sintered stone, featuring a soft bronze or copper bond matrix.
The Mechanism: The soft bond wears away rapidly under the abrasive force of the sintered stone, continuously exposing fresh, sharp diamond particles to the cutting interface.
Rim Style: Only continuous-rim or specialized tightly spaced turbo-segmented blades should be used. Wide-gap segmented granite blades cause excessive impact vibration, which can micro-fracture the edges of a porcelain slab.
Waterjet Parameters
Waterjets offer an excellent way to cut complex shapes and internal sink cutouts in slabs. To prevent cracking during the initial piercing phase, calibrate the machine to the following settings:
Abrasive Type: Use high-quality, consistent 80-mesh garnet.
Piercing Method: Utilize a low-pressure vacuum start or a dynamic pre-drilling cycle. Direct high-pressure piercing can shock the vitrified matrix and crack the slab.
Pressure Settings: Maintain a steady operating pressure between 45,000 and 55,000 PSI.
3. Kinematic Parameters: Feed Rates and RPMs
For automated bridge saws and CNC machinery, cutting speed depends directly on the thickness of the material. The matrix below outlines the baseline mechanical configurations for processing slabs using a standard 400mm (14") specialized diamond blade.
Master Cutting Parameters Table
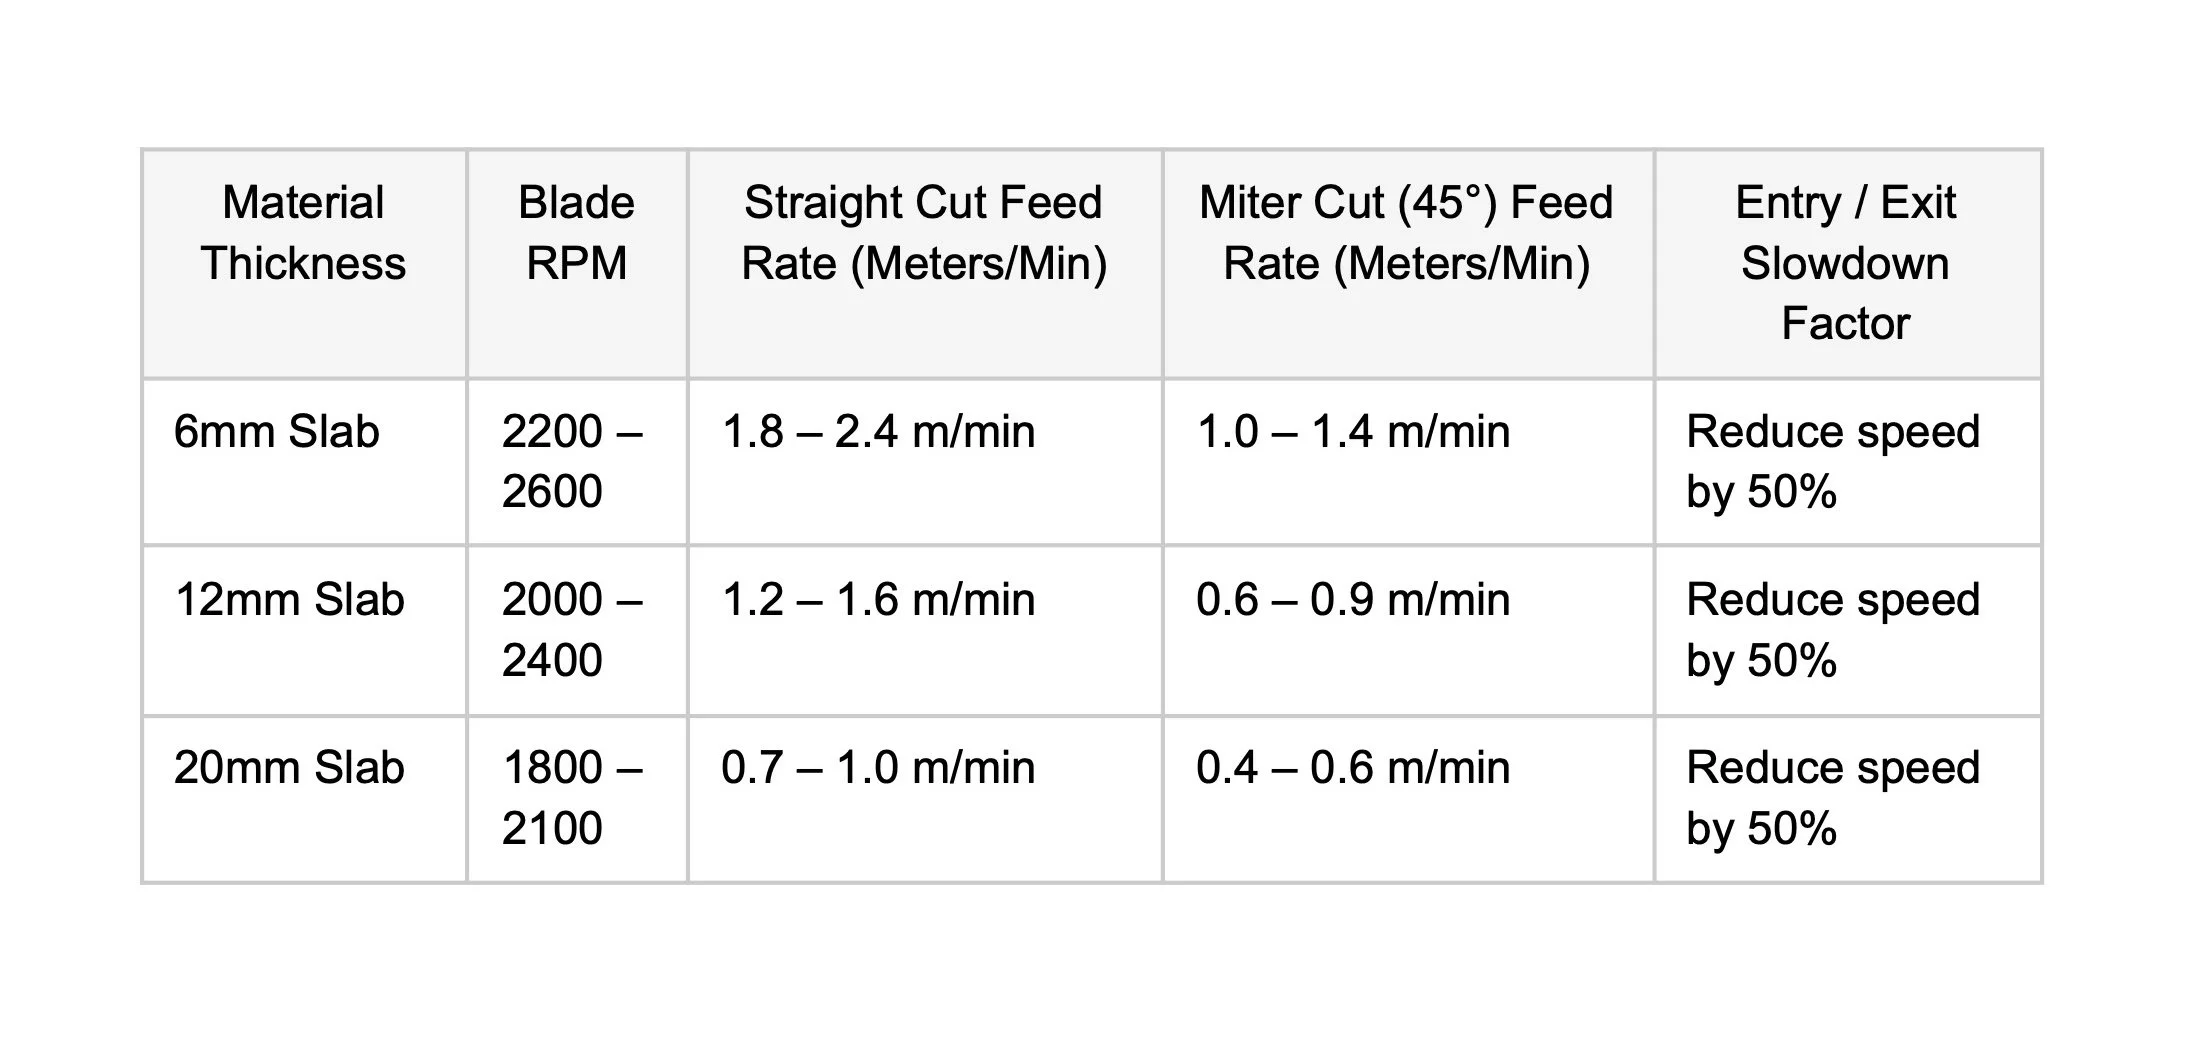
The 50% Slowdown Rule
The most critical zones of a cut are the first and last 10 centimeters. As the blade enters the slab, it encounters sudden resistance; as it exits, the un-cut structural material behind the blade decreases, increasing the risk of corner blowouts.
CNC operators must program the machinery to decrease the linear feed rate by 50% during the initial entry and final exit of the blade.
4. Cutout Engineering: Eliminating 90-Degree Internal Corners
When fabricating sink openings, cooktop cutouts, or L-shaped corner countertops, fabricators must respect the physics of stress distribution. In a rigid glass-ceramic material, an absolute 90-degree internal right angle concentrates kinetic energy into a single point. Any structural movement, building settling, or thermal expansion will drive a stress fracture outward from that sharp corner.
The Fabrication Mandate: Absolute 90-degree square internal corners are strictly prohibited. Every internal corner cutout must feature a minimum radius of 5mm (1/4")
Step-by-Step Cutout Execution
Core Drilling First: Before executing linear cuts for a sink or cooktop opening, the fabricator must use a diamond core bit to drill holes at all four corners of the planned cutout. This establishes the mandatory 5mm (or greater) radius.
Linear Processing: The operator then uses a bridge saw, waterjet, or CNC finger bit to execute the straight cuts between the pre-drilled holes. The linear cuts must never overshoot the core-drilled holes, as any over-cut blade score mark creates a structural weak point.
5. The 45-Degree Miter, Joint Chemistry, and the Arris Edge
Because surface-printed slabs display their decorative design on the top plane, achieving a thick, premium look requires cutting a precise 45-degree miter and folding the edge down to create a waterfall profile
Step 1: Precision Cutting
The miter cut must be executed using a rigid, well-calibrated bridge saw to prevent blade deflection. Ensure the feed rate is reduced according to the specification matrix to guarantee a straight, smooth edge.
Step 2: Solvent Preparation
Before applying adhesive, the mitered faces must be completely clean and dry. Fabricators must wipe the joint surfaces down thoroughly using pure acetone and a clean, lint-free microfiber cloth. This removes all stone slurry, residual moisture, and oils, ensuring a strong chemical bond.
Step 3: Adhesive Chemistry Selection
Never use standard silicone or cheap polyester resins to bond mitered edges on sintered stone. Sintered stone joints require two-part methacrylate or epoxy structural adhesives that are UV-stable and color-matched to the slab core (e.g., Integra Adhesives, Tenax, or Akemi). These chemical systems cure via an exothermic reaction, creating a structural bond that is stronger than the slab itself.
Step 4: The Mandatory Arris Edge (Micro-Bevel)
When a 45-degree miter joint is clamped and cured, the resulting corner edge is razor-sharp. In day-to-day use, a sharp edge acts as a structural point load, making it highly susceptible to chipping from impacts like pots, pans, or belt buckles.
To prevent this, the fabricator must use a fine-grit diamond polishing pad to manually sand down the sharp corner, creating a 1mm to 1.5mm micro-bevel, professionally known as an arris. This small radius distributes the force of everyday impacts, protecting the edge profile from chipping and ensuring long-term durability.